Let’s start with the problem. Although Unreal Engine is cross-platform, it makes logical sense to host the server on Linux. Of course, you could host it on a Mac, but it’s hardly justifiable. So, a reasonable question arises — how do you build the server for Linux?
Next is the problem of building the server for Linux while working on another OS:
- On Linux, there are no issues if you have the resources and space (at least 200 GB of storage, preferably with 8 cores and 32 GB of memory).
- On Windows, it involves a lot of workarounds, but the problem can be the same as in point 1.
- On Mac – this is my case – no matter how hard I tried, I couldn’t get it to work, and each such experiment would overheat the Mac, disrupting my other tasks.
The solution? I decided to try building it in the cloud. Ideally, I wanted it to be so cheap that I could do it over and over again.
AWS does offer something similar, but only through a request (not to be confused with GameLift), and it would probably cost a fortune. I found a solution for just 50 cents 😉
And about the time. In general, building such a project is a slow process on any hardware. But just a heads-up — on the chosen configuration below, it took me 5-6 hours from logging into the server to running the built server.
Below is a dry todo list for copy-pasting, with some comments. But trust me, I learned my lessons the hard way while working through the drafts.
Server selection
I was choosing between:
- AWS, but for a suitable machine, I’d be paying around the same 50-70 cents per hour, if not more.
- DigitalOcean, about twice as cheap as AWS, but with very inconvenient scaling — either not enough resources or space. Or I’d have to purchase extra volumes, which isn’t cost-effective.
- Unexpectedly, my choice fell on Hetzner Cloud. Specifically, their cloud infrastructure, where you can also run a server by the hour. And it only costs €0.093. Isn’t that awesome?!
Here, it’s not worth being stingy and it’s best to go for this one right away:
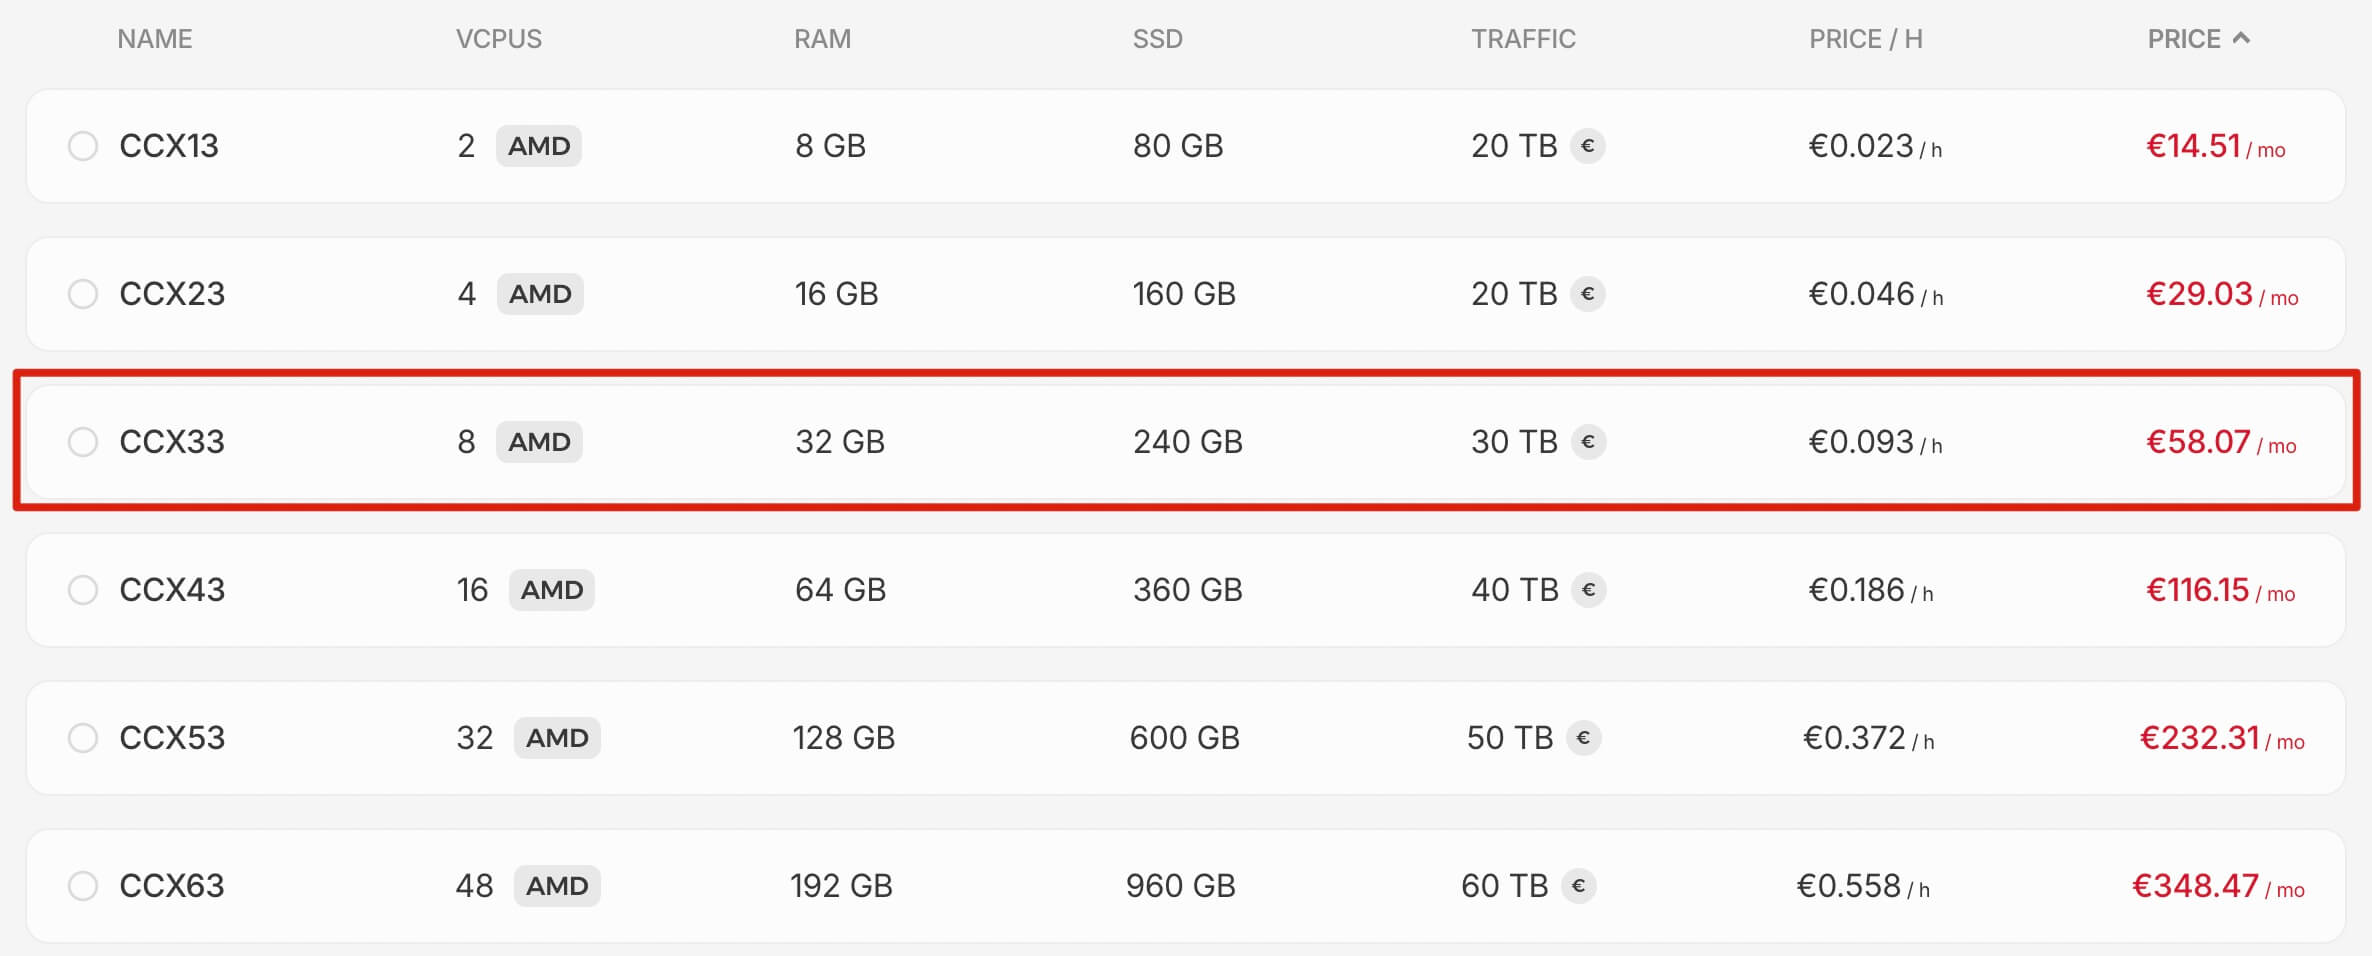
Because you’ll need about 200 GB of storage, and it runs much faster on 8 cores. Yes, I did experiment with the previous option as well.
The OS is Ubuntu. And it has to be version 22.04, as it’s the officially supported version by Epic. Without reading the requirements, I installed the latest version right away, and the build failed at the final stages — it was frustrating (ispc.generated files didn’t build).
Preparation and building the engine
You need to create a user in the sudo group, since building as root is not allowed. Since the server is purely for a single task for a few hours, I didn’t bother with security or permissions systems — I just created a user named builder.
And of course, you should also update the packages.
apt update && sudo apt upgrade -y
adduser builder
usermod -aG sudo builder
When creating the user, it will ask for a password — you’ll need it later.
Next, simply switch to the created user and from there, you can clone the engine repository of the required version (as a reminder, this article is about version 5.5). To access and clone the UE repository, don’t forget that your GitHub account needs to be linked to your EpicGames account.
su - builder
git clone --branch 5.5 https://github.com/EpicGames/UnrealEngine.git
The above operation will take about half an hour. Next, go to the engine directory, run the setup and generation steps, and also remove two plugins that the server doesn’t need — otherwise, they’ll just get in the way.
At the setup stage, you’ll be prompted to enter the password for the builder user.
cd UnrealEngine/
./Setup.sh
./GenerateProjectFiles.sh
rm -rf ./Engine/Plugins/Fab
rm -rf ./Engine/Plugins/Bridge
Now we’ve reached the most critical stage — the build (approx. 3 hours). To be safe, we’ll run everything inside screen, so we can easily reconnect later if we get disconnected (screen -r).
screen -S unreal_build
make
Building the game server
Alright, we’ve finished building the engine, now let’s move on. A quick reminder — we’re currently in the engine directory, so let’s move up a level and clone our own project.
cd ../
git clone https://github.com/anton-ds/DedicateTest.git
After cloning, switch to the engine directory and run the server build command. This will take a couple more hours, but future rebuilds of the server will definitely be faster.
cd UnrealEngine/
./Engine/Build/BatchFiles/RunUAT.sh BuildCookRun \
    -project="/home/builder/DedicateTest/DedicateTest.uproject" \
    -noP4 -platform=Linux -server -build -cook -stage -pak -archive \
    -archivedirectory="/home/builder/DedicateTest/BuildOutput"
A reminder: builder is our user under which we’re building, and it’s also the name of the directory where we cloned the project (in my case, it’s DedicateTest). The final result will appear in the BuildOutput subdirectory of our project.
Running the server and connecting the client
I deliberately did not mention how to properly develop multiplayer games in Unreal Engine in this article (since, to be honest, it’s mostly ready out of the box), because the title suggests you are reading this for a specific purpose — building the server — and you already know how everything else works.
It’s worth noting here that the cloud server has completed its task and can be deleted. You simply copy the BuildOutput/LinuxServer directory to your production server and launch it there. However, I recommend checking the following steps once on the current setup.
On the server, switch to the directory containing our server build and launch the server (first, make sure to open the port the server will listen on — in my case, it’s 7777). Keep in mind, we are still working under the user builder, and we’ll continue as this user. The project code is — DedicateTest.
sudo ufw allow 7777/udp
sudo ufw reload
cd ./LinuxServer
./DedicateTestServer.sh ThirdPersonMap -port=7777
Also, note that in the server launch parameters I specify the name of the map the server will run. In my case, it’s more convenient this way.
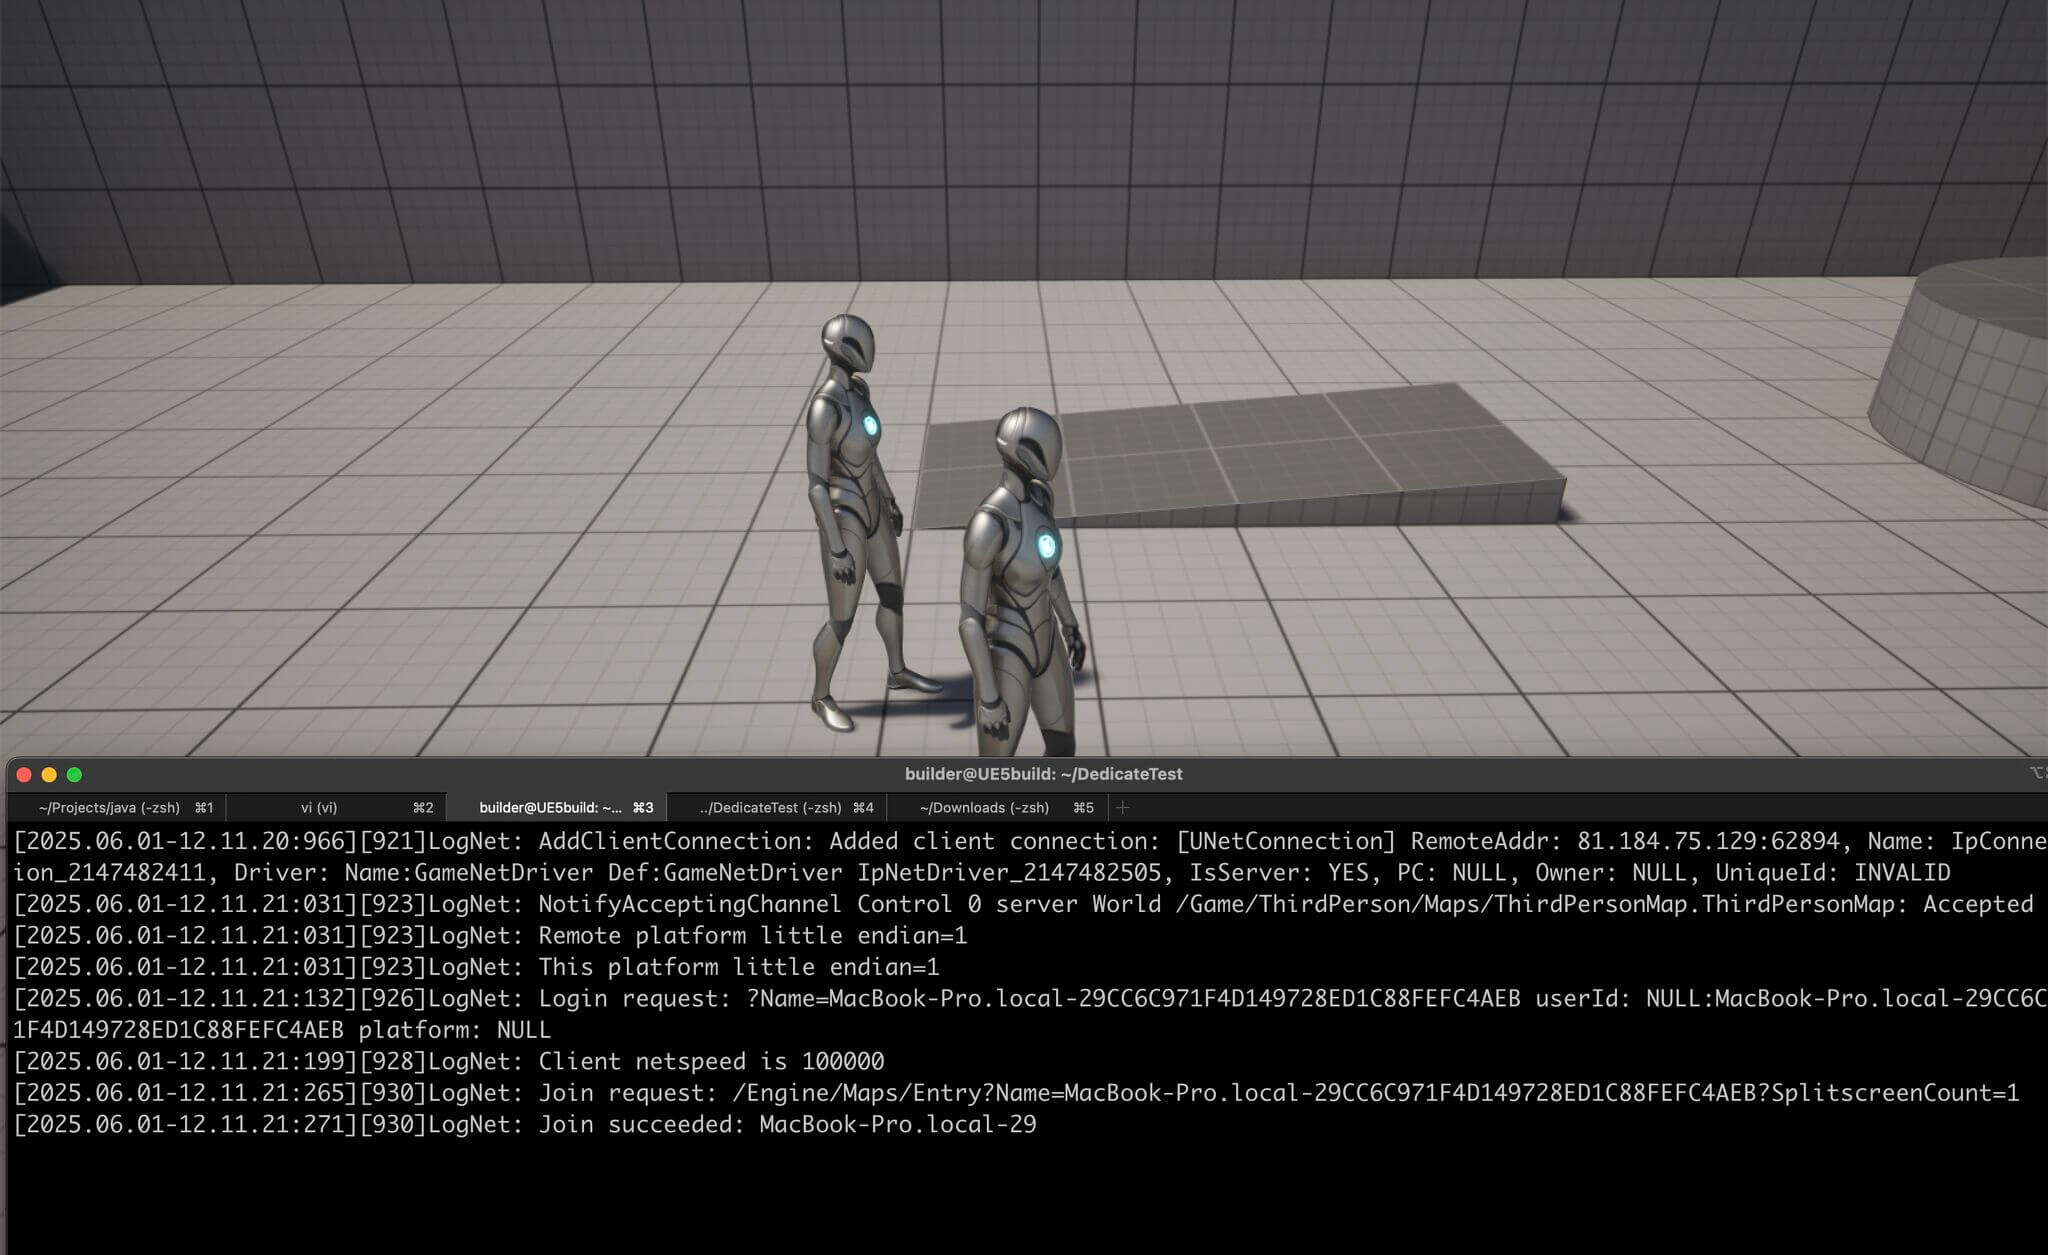
Alright, let’s assume your client is built on the same version — launch the game. Perhaps you already have the logic for connecting to the server implemented, but if not, you can open the in-game console (~) and enter a command with the server IP and port.
open <ip>:7777
In the server logs, you should see a successful connection from your client’s IP. Once you connect with another client, you’ll be able to interact between clients through the server.
But there’s a catch...
Compatibility
There’s a logical requirement — both the server and the client must be built from the same code version. However, Unreal Engine takes this even further — for example, a build from source and a build from the binary version (the one you run from the Launcher) are actually different builds. (And sometimes this version mismatch doesn’t even immediately throw an error)
The simplest and most reliable solution is to build the client from source as well, and this is even recommended for multiplayer games. But we assumed that, for now, we either can’t or don’t want to do this.
So, the compatibility error manifests as follows — when the client connects, the server throws an error in the logs:
LogHandshake: CheckVersion: Incompatible version. bValidHandshakeVersion: 1, bValidNetVersion: 0, GHandshakeEnforceNetworkCLVersion: 0, RemoteMinVersion: 3, RemoteCurVersion: 4, MinSupportedHandshakeVersion: 3, CurrentHandshakeVersion: 4, RemoteNetworkVersion: 2530911350, LocalNetworkVersion: 4263286266, RemoteNetworkFeatures: GenericReplication, LocalNetworkFeatures: GenericReplication
CheckVersion: Incompatible version ... RemoteNetworkVersion: 2530911350, LocalNetworkVersion: 4263286266.
For a quick fix to check if your client works with the server (important! This fix is NOT for production!), you can do the following. Or, you can write your own version checking logic.
In the Source/DedicateTest/DedicateTest.cpp file (the filename may vary depending on your project’s name), add the following:
// Copyright Epic Games, Inc. All Rights Reserved.

#include "DedicateTest.h"
#include "Modules/ModuleManager.h"

class FDedicateTestModule : public FDefaultGameModuleImpl
{
public:
	virtual void StartupModule() override
	{
		FNetworkVersion::IsNetworkCompatibleOverride.BindStatic(&FDedicateTestModule::IsNetworkCompatible);
		FNetworkVersion::GetLocalNetworkVersionOverride.BindStatic(&FDedicateTestModule::GetLocalNetworkVersion);
	}

	virtual void ShutdownModule() override
	{
		FNetworkVersion::IsNetworkCompatibleOverride.Unbind();
		FNetworkVersion::GetLocalNetworkVersionOverride.Unbind();
	}

	static bool IsNetworkCompatible(uint32 LocalNetworkVersion, uint32 RemoteNetworkVersion)
	{
		// here you can add your own logic for checking network compatibility
		return true;
	}

	static uint32 GetLocalNetworkVersion()
	{
		// must be equal to the server version
		return 4263286266;
	}
};

IMPLEMENT_PRIMARY_GAME_MODULE( FDedicateTestModule, DedicateTest, "DedicateTest" );
That number 4263286266 is the network version number from the server logs. Rebuild the client build (not the server), and run it. Everything should work.
That’s it — don’t forget to delete the build server. 😉